How do I use the Screening tab in Website Testing?
Table of contents
In this help, we’ll discuss how to use the Screening tab to:
Set screening on countries, devices, operating systems and browsers
Block certain IP addresses from being recorded
Enable recording of bot sessions
Set recording rules for subdomains
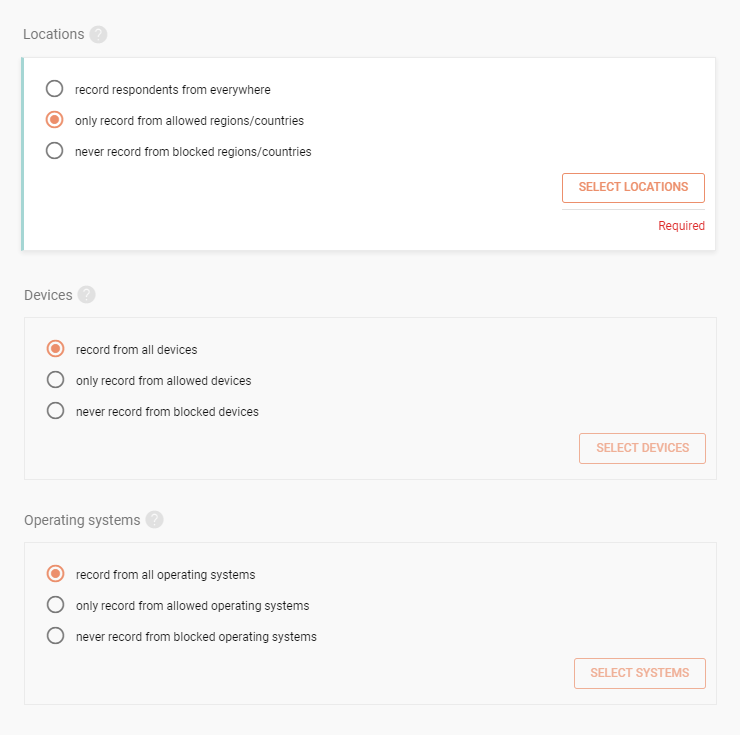
Set which countries, devices, operating systems and browsers should be recorded
Automatically screen out respondents based on the information that can be gained from their IP and user agent information
By default, all respondents are accepted in the study
You can screen out respondents by their location, device, operating system and browser
Either selectonly record from allowed countries/devices/operating systems/browsersto create a whitelist or selectnever record from blocked countries/devices/operating systems/browsersto create a blacklist
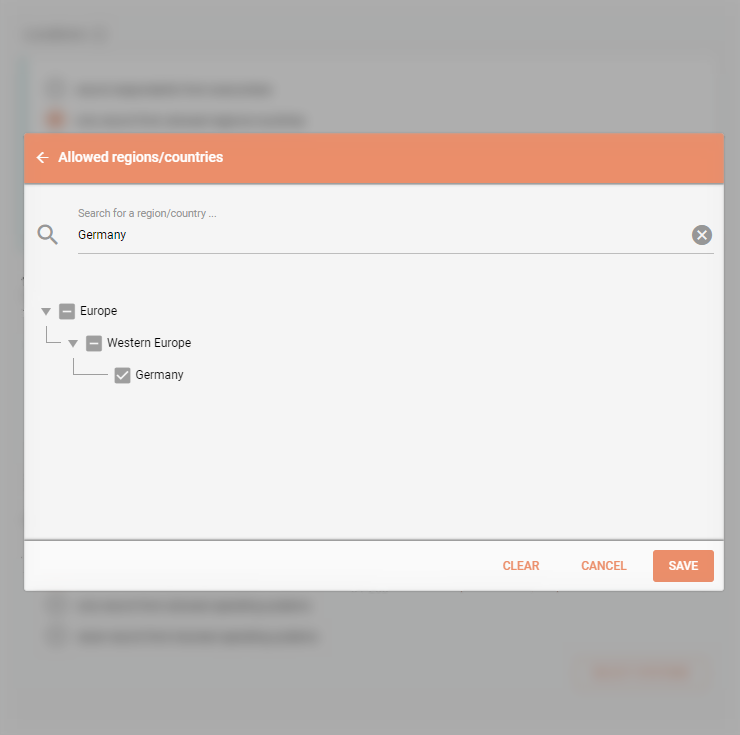
ClickSelect locations/devices/systems/browsersto pick which ones should or shouldn’t be recorded (depending on what you chose in the previous step)
Choose whom to target
For locations, devices, operating systems and browsers, you can select which ones you want to target in your study. You can target absolutely everyone, just a selection of them (whitelist), or everyone except for a selection of them (blacklist).
Creating whitelists and blacklists
To pick locations, devices, operating systems or browsers to be or not to be targeted, simply check the right ones on the list.
Block certain IP addresses from being recorded
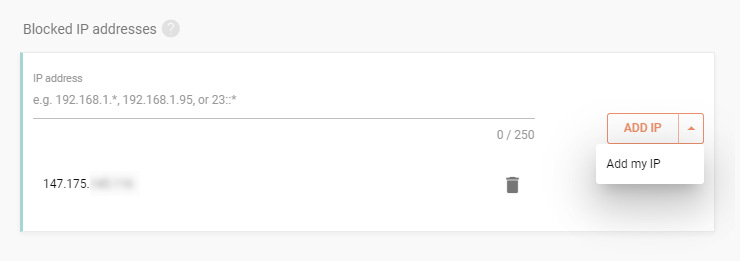
Website Testing allows you to block certain IP addresses or IP ranges (e.g. if you want to block recording sessions from your own team)
Either insert an exact IP adress or define an IP range using wildcards (e.g. 192.168.1.*)
ClickAdd IPto insert another IP address/range to block
For example: You can use this feature to add the IP address of your company router. By doing so, you can prevent recording of sessions coming from your own employees.
Blocking IPs
You block both IPs and whole IP ranges by adding them into the blocked IP list.
Enable recording of bot sessions
By default, Website Testing automatically recognizes bot sessions and filters them out(as they normally don’t tell you anything about real users and only waste your session quota)
However, you can opt to record specific bots by checking which bots are blocked by clickingSelect bots
Alternatively, you can enable recording of all bots by uncheckingdo not record selected bots
Don’t enable bot sessions unless you’re absolutely sure that you know what you’re doing
Set recording rules for subdomains
Website Testing records all subdomains of your website/web app by default
You can enable or disable session recording on subdomains (e.g. only record on production.example.com but not on staging.example.com)
Either selectrecord individual subdomainsto create a whitelist or selectrecord all other subdomains exceptto create a blacklist
ClickSelect subdomainsand in the modal window that opens, write the subdomain you want to add to the whitelist/blacklist (depending on which one you chose in the previous step)
You can either enter an exact subdomain (e.g. staging.example.com) or use a wildcard to match all subdomains on that level (e.g. *.example.com)
All subdomains need to have the study’s domain as their top domain (e.g. if your domain is example.com, staging.example.com is a valid subdomain, staging.examples.org is not)
We need your consent to use cookies
on our website to provide you with the highest level of service.
You can change the settings by clicking the "Settings" button.
These cookies are necessary to ensure the operation and basic functions of the UXtweak website.
They store information about your UXtweak session and help protect your privacy.
Analytics cookies
These cookies are used to analyze traffic on our website, so that we can better understand our users
and improve the site's content, usability and functionality.